Hello there, I'm back (for now). With no class, internship or real job yet- one would think that my life is going pretty slowly right now. I wish that were true. But with the job-searching, application filling, and stress of having my last paycheck deposited, things have not been going smoothly. Although after getting some great news today; I noticed in the mirror that these past two weeks have been visibly wearing me out. My skin was splotchy, bumpy, uneven, dull and tired-looking. It's a sad and unpleasant experience. Not having enough money for professional microdermabrasion, I put together my poor girl's version. I like baking a lot, so I always have extra baking soda around. But most people, bakers or not, have baking soda (and if you don't its super cheap!) It has other purposes also (cleaning, polishing stainless steel, baking, deodorizing, settling upset stomachs, whitening teeth... just get some!) Follow this recipe:
3 parts baking soda (I did 1.5 tp)
to
1 part water (.5tp)
mix into a paste, adding a little more water if you desire. It should stick together enough for you to rub on your face. Apply it all over your face & rub gently in circles. Don't go too overboard with the scrubbing or it will sting. Rinse off with lukewarm water & apply your normal moisturizer.
Your skin should be soft and glowing afterward.
p.s. if your skin is really sensitive, you may want to do less baking soda or more water :)
Thursday, August 25, 2011
Wednesday, July 20, 2011
Boyfriend Approved Eggplant Parmesan
My mom has been growing a plethora of veggies in her summer garden as far back as I can remember. I frequently dreaded the weekends because I knew while my mother crouched in the dirt among tomato, cucumber, pepper and zuccchini plants I would inevitably be on house phone duty. This required me to answer the phone politely and bring it outside to the garden where my mom knelt, covered in dirt and sweat. Answering the phone was only half the battle. I also had to keep a never ending supply of ice water ready. I wish I knew how many times I walked up and down the steps of our deck with gallon sized thermos' filled with either too much ice and not enough water or too much water and not enough ice. I never wanted to help plant or pick anything. Too much dirt, too many bugs and for what, vegetables? Yeah, I don't think so. Well, I'm eating my words now (and some yummy tomatoes thanks to my garden and a kind neighbor).


This year eggplant made his/her first appearance in my mother's garden. As usual she plants so much of everything she and my dad can never eat it all so neighbors and family members benefit greatly. My mom brought some of her eggplants with her when she visited me last. Having no memory of eating eggplant in the past (how shameful) I was weary, and decided those purple suckers needed to be fried, smothered in cheese and tomato sauce at the very least. Thus, eggplant parm. Sorry the above photo is blurry. The eggplants wouldn't quit rolling around on my cutting board. I showed them!
I didn't think to consult a recipe. I'm sure I have an old family recipe lying about somewhere, but I came home from work starving, and there was no time to be thumbing through recipe cards. I would likely become distracted and eventually end up starving to death or making dessert instead of dinner.
I cut the eggplant into, I don't know, 1/4 in. rounds and then treated it like chicken cutlets and proceeded to dredge and bread it.


Coat each eggplant round in flour, then egg and finally seasoned bread curmbs ( I added a tablespoon of dried oregano to the already seasoned bread crumbs btw). And you thought your cake tins were just for cakes!

Your eggplant should look like this when your finished.

And your fingers should look like this, well at least on one hand. Beware of "THE CLAW!"
Add some olive oil and butter to a frying pan. When the butter begins to foam add the eggplant rounds. Be careful not to over crowd the pan. You want the eggplant to brown and become crispy on the outside not to steam (which is what will happen if you cram a bunch in at a time).
Once they have browned nicely on each side, set them on a plate to cool while you get the sauce ready. Side note- I decided to be brave and give the eggplant a try after I pan fired them. Let's just say they were lucky to meet cheese and sauce. Cory and I could have finished them off just like that. FYI you don't have to take the skins off (I didn't my first time) but I think I will next time (it's a texture thing).
For the sauce:
Add a glug of olive oil and a little butter to a heavy bottomed pot along with 1 big sweet onion, chopped. Add some kosher salt (to help the onions soften) and some crushed red pepper flakes (1/2-1tsp depending on your preference). Once the onions have become translucent add 5, or so, cloves of smashed garlic. Stir until garlic is fragrant then add 2 28oz. cans whole tomatoes. I prefer san marzao but Wegman's brand is a close second for sure! Add a big handful of fresh basil and let the sauce simmer and thicken slightly.


Since I was in a hurry, and feeling pretty lazy after work, I didn't chop everything perfectly. I just submerged my immersion blender in the pot until the sauce was smooth.
Assembly:

Place your eggplant rounds in a pan. I had to whip out my obviously too big for this job roaster. My 9x13/13x9 pan was currently housing a batch of brownies.
I added some provolone and mozzarella cheese then sauce then more cheese to the tops of the eggplant and popped them in a 350 degree oven.

This is the boyfriend approved end result. Cory and I both lovveed this dinner. After one bite we looked at each other with big eyes and I said something along the lines of "shut the front door!" It's realllyy yummy. I am an official fan of eggplant.
I found this recipe to be a good guideline. In my experience this was an easy breezy dinner. I even had sauce left over. I'll let you know what happened with it tomorrow. ~L
Tuesday, July 19, 2011
Is it 1950 in here or is it just me?
The other evening Cory and I returned home after a yummy dinner out with the fam. We noticed an older man knocking on our neighbor's door. When our neighbor didn't answer (because he wasn't home, not because he's a jerk) the man carefully walked down the porch steps and said to us "Guess he's not in." I offered to take his name and let our neighbor know he stopped by. The man said that wasn't necessary, he just needed help putting in an air conditioning unit (it's been pretty warm here lately). I quickly offered Cory up to help with the job. The man welcomed the help and said he lived just around the corner. So, Cory hopped in the man's little blue pick up truck and off they went.
I waved and smiled as they drove off thinking "oh $h!t, hopefully I didn't just send Cory off with a serial killer."Figuring Cory could take 'em, I went in the house, unloaded the dishwasher, switched a load of laundry, and fed Lucy. A few minutes later I passed a window and saw the little old truck stopped in front of our house. Cory shook the man's hand and got out of the truck. When I met Cory at the door I realized he was holding a plastic grocery bag filled to the brim. Cory placed the bag down on our kitchen counter and proceeded to take out tomato after tomato and 5 of the biggest cucumbers I've ever seen. The man was so grateful for Cory's help he paid him in vegetables from his back yard garden. How adorable, right?! We both thought it was just the sweetest thing. Even when someone is shaking your globe and it seems like the whole world is trying to bring you down something like this happens. It certainly brought a big smile to my face.

My window sills are filling up with tomatoes. Some are from our garden and others Cory brought home.


Mmmmmmmmmmmm. Mmmmmmmm. Mmmmmmmmmm.

I used whole wheat bread and Kraft mayo with olive oil. I used Ina Garten's trick for cooking bacon. You just put it on a cookie sheet and throw it in a 400 degree oven. It stays flat, gets nice and crispy and you don't risk burning yourself 1,000 times! Stay tuned for more tomato recipes =) ~L
Monday, July 18, 2011
FACT: New Friends Need Cookies
Let's catch up. I mentioned earlier today that things have gotten busier and more chaotic on my end of Huspaz (not in a bad way btw) this is partly because I started a new job. HUSPAZ! You should know I have developed a strong urge to feed people as of late. I think it's due mostly to some genetic mutation that kicks in (in my family) in your 20's. I come from a long line of women who daily, and on special occasion, make a point to cook and bake to fill the tummy's and heart's of close friends and family.
When I meet someone new this internal drive is stronger than ever. "Hi my name is Lauren, are you hungry?" Odd? Yes. Delicious? I think so. I'm not such a bad friend to have. So, a new job means new people, who will most likely get hungry at some point during the day. When they do I'll be ready, recently, with a box full of sweet and chewy sugar cookies.
**To new readers, I don't actually think I'm that cool. Usually I am attempting to make you laugh by being sarcastic. Just FYI. Also, if while reading the above paragraph you were picturing me as some creeper handing out cookies to lure in little children and the elderly you're right on the money. Make sure I'm in a cute outfit in your visual. (Just kidding. I mean about the luring in kids and old people bit. Keep me in a cute outfit as you read on.)** Man, not posting for 2 weeks makes me sound like a real whack job.
Ingredients:
2 3/4 cups all-purpose flour
1 teaspoon baking soda
1/2 teaspoon salt
1 1/4 cups room temperature, unsalted butter
2 cups granulated (white) sugar
2 eggs
2 teaspoons vanilla extract
1/4 cup white sugar for rolling
Assorted sprinkles (optional)

1. Preheat your oven to 350 degrees. Line a cookie sheet with parchment paper.
2. Sift together the flour, baking soda, and salt in a bowl and set aside.
3. In a separate bowl cream together the unsalted butter and 2 cups sugar until light and fluffy. Beat in the eggs one at a time, then the vanilla extract.
4. Gradually add in the dry ingredients. Take care not to over work the dough. We're going for a crisp exterior and a chewy center, not a rock.
5. Using a small ice cream scoop or a couple of tea spoons, form simular sized balls out of the dough.
6. Roll the little sugar cookie balls, to coat, in a plate filled with granulated sugar.
7. Place cookies about 2 inches apart on the cookie sheet and press gently with the palm of you hand to flatten the cookies just slightly.
6. Put the little cookies in the oven they will bake for 8-10 minutes.
7. Half way through the cooking time you can add some sprinkles. Adding them now will cause them to melt a little into the cookie. This looks pretty and insures they won't all fall off before you're friends see them.
8. Allow the cookies to cool just slightly on the cookie sheet and then transfer them to a cooling rack.
9.CHEWY SECRET: the cookies will be chewy when you pull them out of the oven but here's the secret: place all your baked and cooled cookies in a container with a slice of sandwich bread. In the morning your cookies will be absolutely perfectly soft and chewy and the bread will be dry and stale. Good ol' bread!
~L
Dear Readers,
A couple of years ago I decided life is like living inside a snow globe. One minute you're sittin' pretty on a shelf and the next thing you know some little $h!t comes along and shaky, shaky, shaky. You try your hardest to hang on and when the chaos eventually slows you are left with sticky, boogery, smudges clouding your view. I'm pretty sure Forrest Gump's metaphor for life is far more popular than my own but I like mine.
Things have gotten a little crazy around here and I have neglected poor little Huspaz. Even though I haven't been posting, I have been snapping pictures like a mad woman. I've got some catching up to do. Thanks for hanging in there- back to the (somewhat) regularly scheduled program!

Cory, Lucy and I went for a walk downtown by the river. We found a little fishing dock and sat by the water for a while.
~L
Tuesday, July 5, 2011
July 5, 2011
Hope everyone had a lovely 4th of July! My weekend was filled with pasta salad, grilled chicken, corn on the cob and blue raspberry snow cones. Oh, there were fireworks too.

I was honestly more excited about the snow cone (even if it means that I have blue lips in every picture,totally worth it).


Wednesday, June 29, 2011
It's My Jam.
Michaela came for a visit this past weekend (huspaz together at last ;-)). Among other fun things we hopped over to the farmers market on Saturday morning. We walked past adorable bundles of fresh flowers, veggies, berries, fresh breads, local honey and cheeses. I was surprised by how fragrant everything was. I mean, you don't walk into Wegmans and smell the onions, peppers, garlic or herbs unless you are right on top of them (not even then sometimes). I guess that's just another perk of farm fresh food.
I wanted to bring home a little souvenir. One vendor had tables lined with stacks of homemade jellies and jams. There were a bunch of different combinations to choose from. Plum and sour cherry had me at hello, but Cory pulled the reins in and we came home with a classic berry combo.
 Cory and I spread the sweet jam over whole wheat toast. So yummy! The whole kitchen smelled like fresh jam after I opened the jar. More good news- once the jam has been devoured (I'll give it 2 weeks) I'll still have a cute little jar for a tea light, or more jam. Think I can bring it back and ask for a refill? ~L
I wanted to bring home a little souvenir. One vendor had tables lined with stacks of homemade jellies and jams. There were a bunch of different combinations to choose from. Plum and sour cherry had me at hello, but Cory pulled the reins in and we came home with a classic berry combo.

Wednesday, June 22, 2011
Zinnas Round Two
They're bloomin! A few weeks back I posted about the Zinnias I started from seed. Here is a shot of them now.


 After I snapped these pictures something terrible happened. I turned my head for two seconds and all the Japanese Beetles within 200 miles swarmed to my pretty zinnias (ignoring all the other plants in my yard, weird). They started feasting on the leaves and mating it was disgusting! Little jerks!
I was thinking fast and loose at this point(the James Bond theme song started playing in the background). I quickly ran inside, nearly killing myself on a pair of Cory's sneakers, and grabbed a can of bug spray (like for humans). I began spraying the zinnias in a irrational effort to save their little lives. The beetles started flying away and within a couple of seconds my flowers were free of bugs, YAY! Then, the leaves began to shrivel and turn brown, the colorful blooms started spotting and discoloring.
 So, friends, if you see bugs attacking your plants take a deep breath, and DON'T reach for bug spray for humans. Hopefully they will grow back stronger and prettier than ever. I'll keep you posted (HA! get it, posted?! It's funny because this is a blog). ~L

Look how tall they are now!

It's such a treat to walk out and see these beauties in the morning.

I was thinking fast and loose at this point(the James Bond theme song started playing in the background). I quickly ran inside, nearly killing myself on a pair of Cory's sneakers, and grabbed a can of bug spray (like for humans). I began spraying the zinnias in a irrational effort to save their little lives. The beetles started flying away and within a couple of seconds my flowers were free of bugs, YAY! Then, the leaves began to shrivel and turn brown, the colorful blooms started spotting and discoloring.

Tuesday, June 21, 2011
Chicken Dinner With A Back Story
Cory and I adopted Lucy a couple of years ago. We soon discovered that pulling the "fluff" out of the new toys we bought was her FAVORITE thing to do. This was fine with us because she continued to play with the de-stuffed racoons, soccer balls, and bunnies. Plus, Lucy never touched a single shoe, couch pillow, textbook, or trashcan. The only problem seemed to be that the toys at pet store weren't cheap. So, Cory and I started hitting up our local Godwill we snagged second hand stuffed animals for a quarter. Lucy was a big fan, and so were we! It was easier to watch her tare apart a secondhand stuffed teddy bear (that only cost us a quarter) than an $8.99 squeaking duck.
One day Cory and I were out and about and decided we should pick up a handful of things for Lucy to destroy play with. When we walked in, I spotted a brand new Weber charcoal grill. One woman, working, told me that a man donated it earlier because he never used it, not once. SWEET! The grill was only $20. We left with a bag filled with fun for Lucy and a new toy for Cory.
Since I hadn't been cooking or grilling on my own for very long at that point, I made a call home. My mom gave me a great little marinade recipe and I've been using it ever since.

Grilled Chicken Marinade
Ingredients:
1/2 Cup oil (olive oil or vegetable oil)
1 Cup vinegar (I use red wine)
1+ 1/2 Teaspoons poultry seasoning (I like McCormick)
1 Tablespoon of kosher salt
1/4 Teaspoon pepper
1 egg

Mix everything together using a whisk and let the chicken marinade for a few hours. I throw some veggies like red onion, sweet onion, cherry tomatoes and mushrooms (no mushrooms in this case, Cory hates them) in the marinade as well.
I like to use boneless, skinless, chicken breasts. I cut them into 2 inch pieces and place them into the marinade along with the vegetables.
You can marinade whole chicken pieces too and just put your veggies in a grill basket, equally delicious.

Deal of the century pictured above =)

**Make sure you soak your skewers in water for at least 3 hours. ~L
Monday, June 20, 2011
Piece Of Cake!
Happy Monday,
This past weekend I headed home to celebrate Father's Day and my grandma's birthday. I baked my go to chocolate cake in my mom's kitchen. I love this recipe so much. It's not too sweet, has great texture, comes out perfect every time and I always have the ingredients on hand.


This past weekend I headed home to celebrate Father's Day and my grandma's birthday. I baked my go to chocolate cake in my mom's kitchen. I love this recipe so much. It's not too sweet, has great texture, comes out perfect every time and I always have the ingredients on hand.

My grandma loves flowers, so instead of writing on the cake or decorating with sprinkles I took a trip out to my mom's garden.


FYI I never bake the cake for the full 35 minutes as indicated. As soon as the cake pulls away from the sides of the tin I take him out of the oven.
I mix this cake up in a food processor. First I add granulated sugar and give it a blitz, until it's super fine (no need to buy superfine sugar). Then I add everything else, wet and dry together. It's sooooooo little effort and a huge pay off!

I clipped the flowers earlier in the day and placed them in a glass of water until I was ready to use them. Before we headed to the party I stuck the flowers into the cake. If I decorated the cake early in the day the flowers may have wilted. I wonder what tricks professionals have up their sleeves...
~L
Friday, June 17, 2011
Whats For Dinner?!
Let's talk chicken people.
Ahem, what I mean is, let's talk about ways to rethink chicken. I love roasting a whole chicken, I love to pound out some chicken breasts, and bread them to make chicken francais, chicken parmigiana, and chicken piccata. To me, those are all wintery meals. I am craving light, summery food now. The temperatures are rising, the sun is up all evening, and late last summer I found the perfect recipe for barbeque sauce.
Earlier this spring I experimented with this pulled pork concept. You know, you put a big hunk of pork butt (which is actually the shoulder, weird) in the oven and cook it low and slow. So I made up a recipe for barbeque pulled pork. Well, I wasn't overly impressed. The meat was pretty fatty. Even though I purchased a 5lb. piece, there didn't seem to be a lot of meat to eat. I am not a big carnivore to begin with and meat can be expensive. So, I though I would try it with boneless, skinless chicken breasts instead. I am so glad I did! It's so simple and yummy, most importantly everyone loves it (including picky eaters)!
Pulled Chicken Sandwiches
Preheat your oven to 375 degrees.
Place bonless, skinless chicken breasts into a heavy bottomed pot, such as a dutch oven. Then, add your favorite BBQ sauce to cover (my favorite recipe is below).

Cover your pot, and place it in the center rack of the oven. Check the chicken in 40min-an hour tops. When the chicken breasts are nearly completely cooked, take the entire pot out of the oven and turn the oven temperature up to 400 degrees.
Take each chicken breast out of the pot and shred the meat using to forks. Once all the chicken as been shredded, add it back to the pot full of BBQ sauce.


Place the pot back into the oven UNCOVERED. Allow the sauce to come to a boil, reduce and thicken. Then, place a big spoonful on a hamburger bun.

My Favorite BBQ Sauce Recipe
Adapted From Tyler Florence's Recipe
Ingredients:
½ pound of apple wood smoked bacon
2 bunches of fresh thyme or 1 big bunch (must be fresh thyme)
1 sweet onion chopped
4 gloves finely minced fresh garlic
4 cups of ketchup
½ cup light brown sugar
½ molasses
4 tablespoons red wine vinegar
2+1 teaspoon tablespoons dry mustard
2 teaspoons ground cumin
2 teaspoons smoked paprika
Salt and pepper
Extra Virgin Olive Oil
Add oil to a heavy bottomed pot, such as a dutch oven. Add the roughly chopped bacon. Now, turn the burner on to medium high. Starting bacon in a “cold” pot will allow it to render more fat (fat = flavor). Then add the 2 bunches of fresh thyme (with their stems).
When the bacon starts to render some fat, add the chopped onion. Add a pinch of kosher salt now (this will draw the water out of the onions, and help them cook down and become sweet).

Now add all the spices (make sure to stir everything together). Add the minced garlic and stir until you can smell the garlic (about 40 seconds). Take the pot off the heat and add the brown sugar, molasses and ketchup.

Put the pot back on the heat and let it come to a boil and then allow the sauce to simmer for 20 minutes.

Strain the sauce through a mesh sifter. Leave behind the onion, thyme and bacon. The finished sauce should be completely smooth. **The sauce in the picture above has NOT been strained yet**
Wednesday, June 15, 2011
E-A-S-Y P-E-A-S-Y
A couple of weeks ago Cory's darling mamma (hi T ;-)) shared a recipe with me. It is equal parts delicious and simple. Perhaps you have heard of this fantastical concoction, they call it a "slap yo mamma" margarita. Your mother may find the title slightly degrading, hand her a frosty glass full and she will certainly forgive you.


 **Dink responsibly everyone obvi, and if the great creator of this recipe stumbles upon this site, e-mail me and I will gladly give you credit.
Cheers! ~L

Ingredients:
1 Corona
1 12 oz can of limeade concentrate (frozen section)
2 cans of Sierra Mist or 24 oz.
8oz. or 1 cup of tequila

Mix everything up together in a pitcher. I used a whisk to help break up the limeade. You can serve this right away over ice, or......

pop that bad boy in the freezer, wait 1 hour, then enjoy the perfect-est slushy ever. For reals guys, (and gals) I wouldn't spend a second typing this post if I didn't know, for a fact, you'd love it :)
Also, what? you have more in your freezer than chocolate chips and margaritas? Mom, if you're reading, there are also 2 bananas awaiting their final destination in a loaf of banana bread. So, don't freak out.

Cory and I decided on tacos for dinner and margaritas sounded like the perfect side dish to me!
After dinner something terrible happened...

Cheers! ~L
::NEWS BREAK::BLEEP BEEEP BLADEEP BLEEP BEEEP BLADEEP Wildflower Update!!
As far as things go in the real world this is hardly breaking news but it happens to be a big change in my little garden. Recently, I posted about the wildflower seeds I planted (seen here: "Cant Make It Worse, Right?"). I promised to post again when more of the flowers were in bloom, so here goes!

Don't the blossoms (above) look like butterflies?!

Brightest of the bunch.


The blooms aren't gigantic, the plants are not very tall, but they're awfully sweet! Don't you agree? I've been bringing them in by the handful everyday this week so far. ~L
Things to Love-Yellow
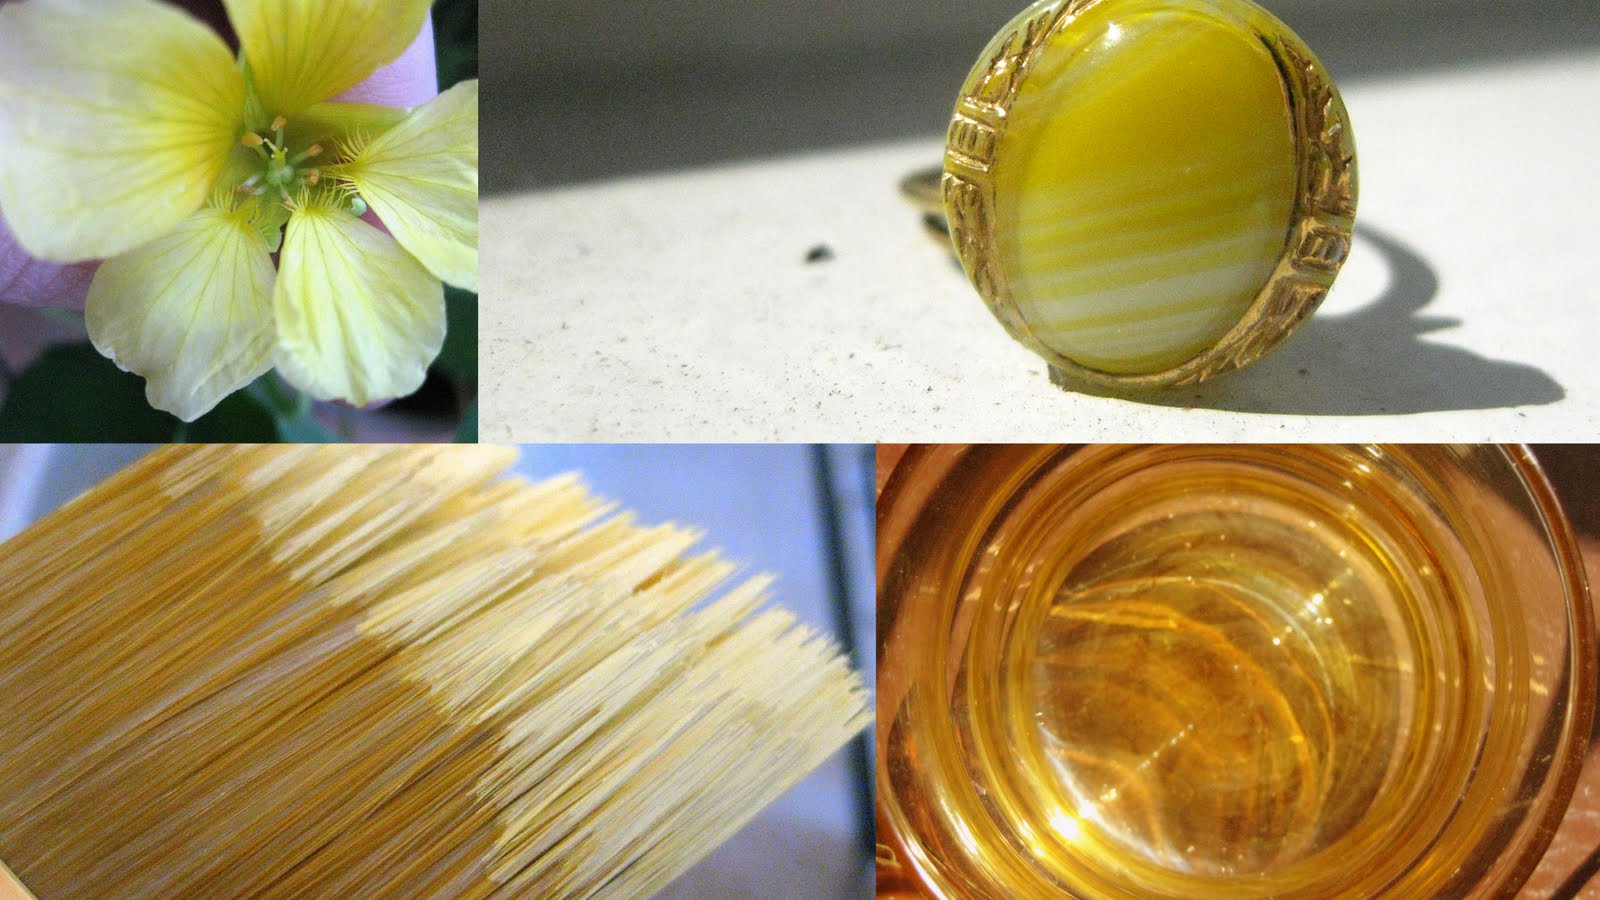
This week I can't help but be drawn to the vibrancy and life of yellow. Everywhere I look I see it; even in my apartment and garden. Clockwise from top left, a newly blooming yellow nasturtium flower, my favorite glass button ring, the pale yellow paint I've been using, and finally my favorite glass.
thanks for reading,
m
Tuesday, June 14, 2011
Grapefruit Mint Cocktail

Grapefruit may be an acquired taste for some lighthearted individuals; but I've been throwing back this sweet, but mostly sour juice since forever. Andy won't touch it; big baby. So if I've got some leftover (which I normally don't) I try to think of different ways to use it.
I, like most girls, find that mixing alcohol with lemonade or orange juice is delicious. So the other day it hit me! Why not use grapefruit juice instead of my other tried & true citrus mixers? I was pleasantly surprised at how very refreshing, slightly sweet, adorably pink and pretty delicious, this summertime cocktail turned out to be. Yet another crowning achievement for the grapefruit. I hope you enjoy. And if you don't like grapefruit, that's okay. This also works well with lemonade, pomegranate juice, orange juice, etc. Have fun mixing it up. (It can easily be a virgin cocktail as well, just omit the rum and sugar).
2 shots of rum
1/2 C Grapefruit juice
1/4 C seltzer water
2 tp fine sugar
mint leaves to taste
ice
Mix all ingredients in a glass for two servings, or double it for a pitcher

thanks for reading,
m
Subscribe to:
Comments (Atom)