Tuesday, May 31, 2011

Container Gardening

My container garden has been making some exciting progress since my last garden post! 

It is amazing to watch all of my little plants grow strong... and actually avoid dying for once.

Other than the occasional hungry aphid, I haven't faced many challenges with my veggie/herb garden {fingers crossed!}

So enjoy these pictures; hopefully they make you as happy as they make me!


My first ever sweet pea = pure joy


Whenever I water my lavender plant it's lovely scent wafts up to my nose.


My vegetable road. From bottom to top: Bianca Bell peppers, Orange Bell Peppers, Purple Cherry Tomatoes, and my Japanese Eggplant.


Remember when I said that I planted some Dwarf variety carrot seeds in the bottom of my cherry tomato pots?? Look at what happened! I have a zillion carrot seedlings! Thanks for the tip Martha!


The aphids seem to really love the leaves of my Eggplant bush- but hopefully tomorrow I will find a safe/organic remedy for that issue. I took a close up of what I think may become my first eggplant flower!

Happy Gardening!

m


Friday, May 27, 2011

Books

The Red Tent…

In this historical-fiction novel, Anita Diamant breathes vitality into the biblical story “The Rape of Dinah.” 

Wait!! Hold on!!- Don’t let the Christian stuff scare you away! Although the story is derived from the bible, The Red Tent itself is not reminiscent of boring Sunday-School type lectures and nodding off in a pew…

Dinah’s story begins with her birth and the novel follows her through to old age. Throughout Dinah’s story her mothers (plural on purpose), siblings, friends and extended family weave a painful, powerful and passionate story about love, forgiveness, anger and all those themes that make books great.

It’s definitely a good read, check it out if you are interested in women’s topics especially. Or if you have a mom, an aunt, a sister or a daughter. or a female best friend. Just read it!

******************************

A Scattered Life…

Firstly- never before have I felt such strong dislike for a little old grandma, but the one in this book is a hard pill to swallow.

This novel follows the life of a young mother, Skyla, who has no friends, no family other than in-laws {see the old grandma}, no job/career, no meaning in life… Getting the picture?

New neighbors change all that for Skyla.

This book seems straightforward at first, but a massive, gut-wrenching twist keeps this from being your typical lackluster-unfulfilled-housewife-storyline that we’ve all heard before.

You will definitely cry reading this one. After I read it, I still felt like Skyla deserved a better life; so you might be slightly disgruntled at the end.

Thursday, May 26, 2011

Waste Not, Want... Strawberry Lemonade?

How many times have you forgotten about the pint of strawberries you purchased earlier in the week? I personally think mine age about a week as soon as I walk through the front door. This recipe makes great use of berries that are far from scoring a seat on your fruit platter, but not quite ready for the trash can (or compost, ahem).
This recipe uses 4 simple ingredients: sugar, lemons (zest and juice), strawberries, and water.
 You will need 5 or 6 lemons for this recipe in order to obtain about 1 cup of lemon juice. So, how do you pick a nice juicy lemon? Try to choose one that feels heavy for its size and don't shy away from lemons with points on the ends, often they will yield more juice.  
1. You will need 1 cup of lemon juice. Start by zesting (using a wrasp or microplane zester) 5 or 6 lemons. Then cut them in half and squeeze them through a strainer (to catch seeds and pulp) into a liquid measuring cup. 

2. You will need about 2 cups of strawberries (if you have a little less, don't freak out). Go ahead and hull them. Then cut the smaller berries in half and the bigger guys into quarters. 

3. Add the lemon zest, berries, 1 cup of granulated sugar, and 1 cup of water to a sauce pan. Bring to a boil and turn off the heat. 

4. Once the mixture has cooled (slightly) strain the mixture in to a bowl. (See Below)
5. Using a spatula, stir and squish the berries (yes, those are technical terms). They still have a lot of juice in them. Then scrape the underside of the strainer to get the good stuff (basically a strawberry puree) into the bowl.

6. Pour the ruby, syrupy, liquid into a pitcher and add the 1 cup of lemon juice. This is essentially a concentrate. You can add flat, filtered water or a fizzy, sparkling water (for a little effervescence) to dilute the entire mixture. You could also add 3 or 4 tablespoons per glass of water.
It's like summer in a glass! Feel free to add vodka. Can't have too much of a good thing, right?!

~L

Wednesday, May 25, 2011

Had To Be Done

Every once in a while I get "the itch". Suddenly everything in my house, in my opinion, needs rearranging. The furniture in our house has stayed in pretty much the same spot since we moved in (due to space constraints), with exception to a few side tables. The surfaces of end tables, coffee tables, shelves, nightstands and dressers are another story.  Since the overall layout of our furniture has remained the same, switching up books, pictures, and nicknacks is my little way of sprucing up the place. It's an easy, and FREE way to refresh your living space, plus its renter friendly! I have a handful of tricks up my sleeve that I have acquired in my 4 years of renting. They usually help me feel more at home, inspired and energized.

1. Clean Slate! Tonight after dinner I decided I'd had it with the current arrangement of the built-ins in our living room. I completely cleared the shelves of all their things and gave them a good dusting. Ahh... clean slate.
2. Shop the house! I am always moving accessories around. When I get bored with the built-in shelving in our living room I head to my bedroom, the attic, the kitchen shelves, or the china cabinet. I borrow some books and swap out artwork, suddenly everything seems brand new. You don't need to go out and buy a million new things every time you get bored with a space in your home. In fact, I prefer the "collected over time" look. 
3. Accessorize with things that are beautiful and functional. This is especially important if you are limited by space. You don't want a bunch of stuff junking up your house, right? I try and keep this in mind when I am shopping. If I come across something in the store that I can't literally use, normally I won't buy it. I find cookbooks, art books or interior design books an endless source of inspiration. I love having them by my couch, so when I'm lounging in the evening I can pull one off the shelf.  


 Anyone out there feeling stuck? Try moving some of your favorite things around. -L

Rhubarb Blackberry Crumble

Last weekend Andy & I traveled to visit his parents at their lake house. The lake is great for laying around and reading, eating more bagels than most people eat in a week, and avoiding getting splashed with water by the dog. She {the dog} actually does it on purpose, and always to me. I think I need to assert my dominance over her somehow... :-)


But this time; thanks to a tip from the next door neighbors, we discovered that there were not only delish homemade doughnuts, but tons of rhubarb for sale at the local Amish store. At Giant Eagle, I can buy rhubarb for $8.99/lb-- the Amish people were selling it for .90/lb. I couldn't believe my eyes! I immediately bought 2 1/2 pounds. Which is a lot of rhubarb. 


I love impulse buys.  


So I lugged my rhubarb back to our apartment, chopped 1/3 of the pile up, and froze it for the future. Then I made some more compote {see earlier post- Rhubarb Compote}.


But then, oh my my my. I made a Rhubarb-Blackberry Crumble.


**********************


Fruit Filling


3 Cups chopped Rhubarb
1 Cup fresh or frozen blackberries
1 Teaspoon vanilla
1 Cup of caster sugar
2 Tablespoons of unsalted butter


mix all of your ingredients in a medium sized pot.


Simmer it for 5min or so over medium heat. turn off the heat, and pour into a pie pan or square pan. let it sit while you get the topping ready.


Topping


1 1/3 Cup self-rising flour
1/2 Cup Brown Sugar
1 1/4 sticks of unsalted butter, cold, and diced


Stir the flour and sugar together in a bowl. Dump in your butter, and using your fingers, blend the butter into the flour-sugar mixture until it feels and resembles damp sand. 


Sprinkle the topping over your hot fruit. 


Finally sprinkle some more brown sugar over the top. {Put a cookie sheet under your pan to catch any bubbling over}


Slide it in the oven at 375 for 45min. Or until the topping is golden brown and the ruby red juices are bubbling up around the edges.


Let it sit for 10min before gobbling up with vanilla ice cream.


oh so good.


m


Tuesday, May 24, 2011

While Water Boils

Tonight we're having pasta tossed in a rich, meaty red sauce with basil, ricotta and a ridiculous amount of pecorino romano cheese. The whole world and all it's problems simply passed us by. Tonight Cory and I sat, together, while the water boiled. 
To anyone who is reading and who cares, Cory is basically the coolest guy ever. He is helpful and kind and it is nearly impossible to stay mad at him. I can't tell you how much I enjoy sitting in our picnic table sipping on cheap wine and watching Lucy chase the squirrels out of our yard. I'm sure there are a lot of people with bank accounts as big as the moon who would tell me they have it better, but I think I'd have to disagree.
This is just extra virgin olive oil, kosher salt, pepper and a little rosemary. We like to dip our bread in it.
Couldn't help sharing this photo. It's the dress I'm wearing and our newly painted picnic table.
Here's dinner. I enjoyed it as much as my company.
-L

Anthropologie Wall Art for $0

I love the store anthropologie; I love the clothes, the books, the housewares, the decorations, and especially the jewelry and candles. But damn is it expensive. Since I am on a tight budget as far as food, rent and gas are concerned- I don't have a lot of wiggle room in my bank account for copious amounts of inspiring art for my walls. 

After making trips to anthropologie, my hands may be empty, but my little creative mind is full. They always have beautiful pieces/decorations around the store, and more often than not they use common household items like newspaper, cupcake liners, and even dixie cups! The following project can be made by you, for $0. I am saying $0 because for me, and many of my friends, scissors, tape and paper towel rolls are usually already around the house.

*******

Step 1

Collect your items.

start with as many paper towel rolls as you want, I have used four so far, but I am planning on making my flower much larger. 

{You can save up your paper towel rolls and even toilet paper rolls for this project over time}

Gather up regular or double-sided tape and a pair of scissors.


Step 2-

Flatten your paper towel roll


Step 3-

Cut 1/2 inch strips out of your flattened paper towel roll


Step 4-

Using your tape, connect the pieces of cardboard into a little design, you can do a star, flower, vine, etc. anything you like


Step 5-

keep adding onto your design until it looks perfect to you. 

oh and don't worry about people being able to see the tape or little printed words on the strips, when its up on the wall, you can't see the little things at all.


thanks!

m


Monday, May 23, 2011

May Twenty-third

I hope the rest of the week decides to be as perfect as today was. For the first time in what feels like a month; it was not rainy, cloudy and depressing today in Pittsburgh. Mr. Golden Sun actually did shine through. All day long. Ahhh.

Since Andy had the day off in order to get our car fixed; this afternoon we were able to get all of our veggies, herbs and flowers into their cozy-permanent-pots. Being someone who is prone to getting overly excited and rushing; I miscounted pots/plants and we had to run back to home depot to get more pots and more soil.  But once everyone (I treat my plants like little people too) was tucked away, watered for the day, and arranged prettily about the deck- the effort was worth it. 

I also got a little bold during my outings to home depot and bought some dwarf carrot seeds which I sprinkled around the tomatoes plants- hopefully something happens there... 

I've just found gardening and watching my plants and flowers bloom so much fun and honestly, so far at least, a lot easier than expected!

The other great thing about today is it was our first day with our brand new (well brand new to us) table, chairs and umbrella on our deck! Since we now have a rooftop paradise, we had our dinner al fresco. 

Oh yeah, and dinner was amazing too! Tomato, avocado salad (greens courtesy my window box lettuce, see post), and salmon burgers with chipotle-lime mayo. I was planning on making Laurens Life Changing Lemon Basil Mayo, because I love it, but we only had limes. So I mixed the juice of 1/3 of a lime, a teaspoon of Mexican Style Smoked Chili Powder, and some salt into a 1/4 cup of mayo. It is also fairly life changing, just in a more South of the Border way.

Seriously, Andy is picky and he said it was delicious, so it has to be pretty good.

Overall, it was a great day, but probably my favorite part of the day happened on my walk home from work. I love love love peonies. They are gorgeous and smell great- so when I saw a bush of bright, hot pink peonies growing next to a vacant house, the 'thrill-seeker' in me ran up and started yanking. I was totally terrified someone was going to be like "Hey girl! Stop that!" I would have peed my pants (I am a big baby). But no one did. And now I have a lovely, slightly ant-y, bunch of peonies in my room.


Thanks

m


AHHH!! My Thumbs Are Turning Geen

Didn't mean to send you into a panic. I don't have an infectious, skin discoloring disease. I am simply having great luck in my first ever garden. So far, I have planted basil, rosemary, chives, mint, parsley, tomatoes, lettuce, red pepper and strawberries. Everything is doing great so far, and don't tell my Mother, I am sort of enjoying the process. 

Boy is it a process! I wanted to make sure everyone (everyone?? Look at me talking about plants like they're people....) was planted just the right way, with the perfect amount of sunlight and organic fertilizer. I have already been able to enjoy a handful of the sweetest strawberries and tons of fresh herbs. Here is a sneak peek. It looks a little boring now. Can't wait to write a post once all the plants start producing!
Noticed a couple of my cheery tomatoes coming in!

 I think something is about to happen with my red pepper plant.


These are the flowers on my strawberry plants. So Cute! (side note... like I said before this is my first garden, so I didn't know that those flowers turned into the actual berries. I'd be lying if I told you I didn't pick a handful, put them in a little vase and then wonder why my strawberries weren't growing...oopsies)
See, I figured it out!

I spotted this little guy out there too.

 Happy gardening! -L

Saturday, May 21, 2011

Tranquil Bay Meet Our Picnic Table

There's been a lot of chatter regarding paint colors around here, and we finally picked one! I know, what a relief, right? Originally, Cory and I were considering yellow and about 5 different blue-green combinations. When we were sanding the picnic table (seen in the "Yeah, I Packed My Picnic Table" post) we revealed a nice minty green layer. So, we settled on a color called "Tranquil Bay" by Valspar.
We painted the top and sides of the table first. Once those parts dried, (which didn't take long given the 80 degree temperature) we flipped the table over and began painting the underside.
We took a short lemonade break while the bottom dried. 
Apparently Lucy needed a break too.
 
TA DA!!!! Isn't she pretty?! We opted for an exterior paint and it covered beautifully. We didn't even need to use primer!

Psst...When we went to Lowes to pick up the paint we noticed some picnic tables for sale. They were smaller than our picnic table and priced at a whopping $96.99 (that price didn't include the $10 fee you would be charged if you wanted someone to put it together for you). If you recall we purchased ours (second hand along with some other things) for $12 and spent around $20 for a gallon of exterior paint. Hello savings!!! I also have a nice tan and some natural highlights. Can't beat that!

Happy Saturday Everyone, Hope you were able to enjoy the sunshine!

Friday, May 20, 2011

Life-Changing Lemony Basil Mayo

For the first time all week, I was able to walk around outside without fear of an abrupt torrential down pour. My basil grew a ton with all the rain so, I sniped a handful of leaves and headed for the kitchen.
 All you need is a handful of fresh basil, the juice and zest of 1 lemon, a cup of mayo and salt and pepper.
First combine the mayo, salt, pepper, lemon juice and zest. (I used Kraft mayo with olive oil)
 Then add your chopped basil and mix everything together.
Lemony basil mayo goes great with fresh veggies and is D E L I SH on a cheeseburger or sandwich. I'd give it a try especially if your not a huge fan of mayo in the first place. It's a lot lighter and zippier than regular mayo. Enjoy!!

May Twentieth

Today when I got home from work, I stepped outside onto my porch and just had to take some pictures of the glorious progress in my container garden. Look down to see a little bit of what we're growing...


This is my first time growing Japanese Eggplant, and while it is still just a small little thing, I am already falling in love. The stems and bases of the leaves are a beautifully deep, velvety purple. I can't wait!


Lovely, isn't it? Nasturtium flowers are a vivid orange, the blossoms explode and pop out prettily around my deck. Another perk is that they are edible. I'm thinking that chocolate ganache cupcakes with a vibrant Nasturtium on top would be perfect.


Last but not least, my romaine and butter lettuce have been growing so quickly that I can barely keep up. To grow your own, see my post titled "Window Box Lettuce"

Happy Friday

m


Rhubarb

Yay! Spring has come and that means rhubarb- After a really long, bitterly cold winter, rhubarb's gorgeous red-pink color, and apple-y smell is a sight for sore eyes.


Sadly, Rhubarb has a short season; most of us find it in the grocery stores and farmers markets in early spring. Here in Pittsburgh I first saw it in April. If you’ve never seen it; rhubarb looks like extra long, red celery, with long fan-like leaves at the top. The leaves are actually toxic, and therefore are not edible. In fact the grocery stores remove them before putting them out to display; and at farmers markets the vendors often cut off the leaves before handing them to you.

Rhubarb is really very tart. Think way under-ripe blueberry. According to my mom, back when she was a little match-girl, she used to break off a rhubarb stalk, dip it in sugar, and chomp on it like that; then she would head out and wail on the city’s meanest bullies (love her). Apparently rhubarb grows abundantly in the UK, and along the streets of my mom’s old Glasgow neighborhood. I have never grown it myself, because I don't think it would do well in containers, but I have heard that it practically grows itself. Although my mom could eat it raw, most of us would not find that experience pleasant... but this is where the fun comes in

So far this season, I have not had the time to make my normal strawberry-rhubarb pie. But I can’t resist buying it whenever I see it standing alone, being passed by people who don’t know what they are missing. So because I didn’t have the time to make a pie crust, but still wanted the tangy-tart-sweetness of the rhubarb- I made rhubarb compote. 

Compote sounds like a scary word, at least to me. I think of lots of chopping, lots of spices, boiling hot liquids, etc. but this rhubarb compote has 4 ingredients. Rhubarb, sugar, a splash of lemon juice and fresh ginger. I promise its delicious and so easy to make.

3 cups of chopped rhubarb (1 inch cuts)
½ cup sugar (I used normal white granulated)
1 tablespoon fresh ginger
Splash of lemon juice

Chop your rhubarb, (just like celery) into chunky 1 inch pieces. Compote should have texture and chunks, you don’t want smooth. Rhubarb has long stringy fibers running vertically through the stalk, make sure to cut those. 

Throw them into a medium saucepan (over no heat), along with the sugar. It will seem like a lot of sugar, but remember rhubarb is really tart. Let your rhubarb and sugar sit, stirring occasionally, for about 15-20min (OFF THE HEAT). the sugar will draw out the juice within the rhubarb, which will create enough liquid to boil the fruit in.

After 15min or so, turn on your heat under the saucepan. Set it to medium/medium-high. Don’t walk away and leave your fruit, the temperature/consistency needs to be observed. If it really seems too dry, add an 1/8 cup of water. Let your mixture bubble and break down. 

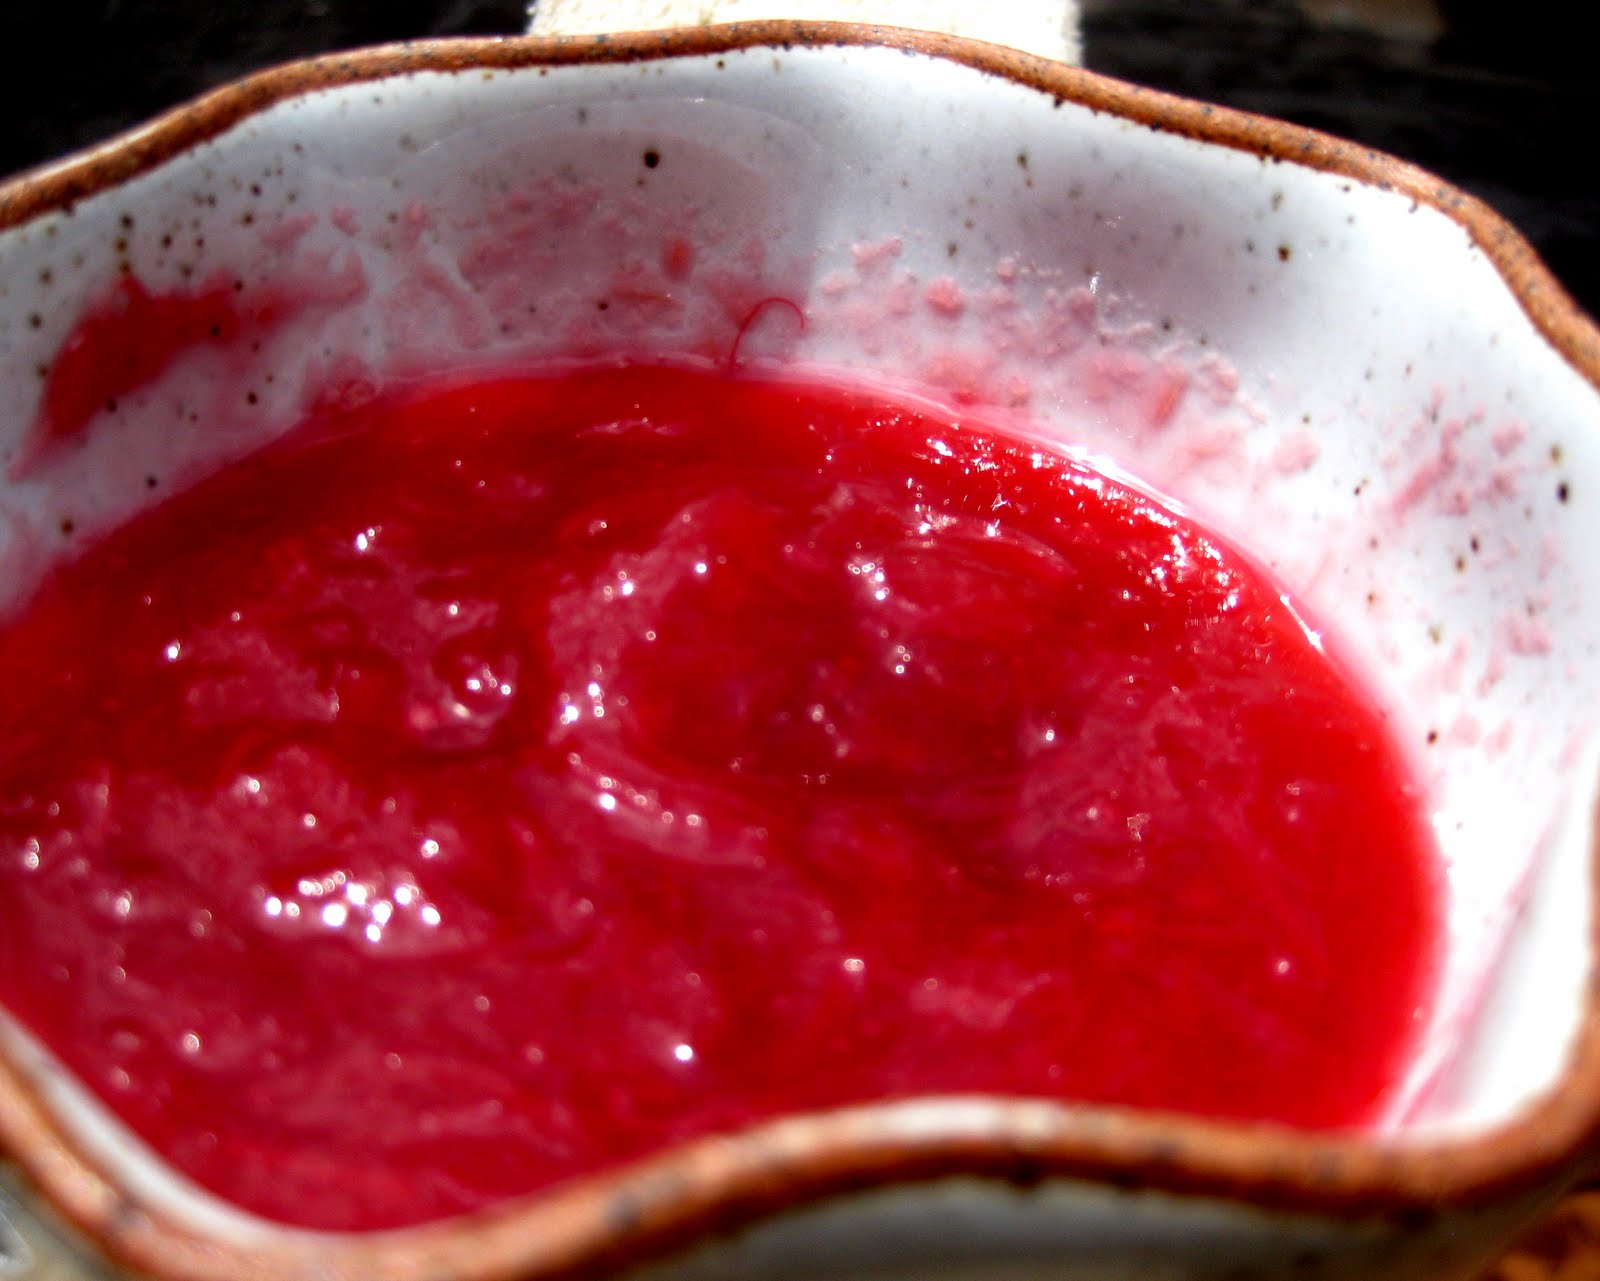
You can smash a few pieces here and there, but remember we want a little chunk. It should thicken nicely in about 7-10mins. And it will thicken even farther after it cools. Take the compote off the heat and mix in your ginger and tiniest splash of lemon juice. I like a strong ginger flavor, but if you don’t you can omit it entirely, or add less.

Rhubarb compote is fantastic with vanilla ice cream, waffles, toast, pound-cake, with yogurt, cake, scones; the applications are both endless and delicious. It will keep for about 1 month (if it lasts that long) in an airtight container in the fridge. Just warm it up in the microwave or on the stove top.

Rhubarb compote is also a fun and appreciated gift. I love giving pint sized jars full of rhubarb compote to friends, colleagues, neighbors, etc.

Enjoy!

m